Part 1: Building a Pathway
Carium Pathways enable care teams to manage intricate workflows with the goal of improving patient care and care team efficiency. A Pathway consists of a series of steps arranged in stages, which serve as waypoints. Each step can facilitate multiple interactions or automations, making the Pathway engine an effective tool for providing more thorough and efficient care.
The system can support multiple Pathway specifications (specs) that can then be assigned to patients through an enrollment process. Patients can be enrolled in multiple Pathways simultaneously. When a patient is enrolled in a Pathway, the system creates an “instance” of the Pathway spec.
In its simplest form, a Pathway can be used as a checklist. The items in the checklist can optionally be assigned to member of the care team and the status of each item can be tracked.
The diagram below shows a sample of the full capabilities that surround the Pathway engine. In this guide, we will be discussing only those features shown in color. The remaining features will be covered in other guides.
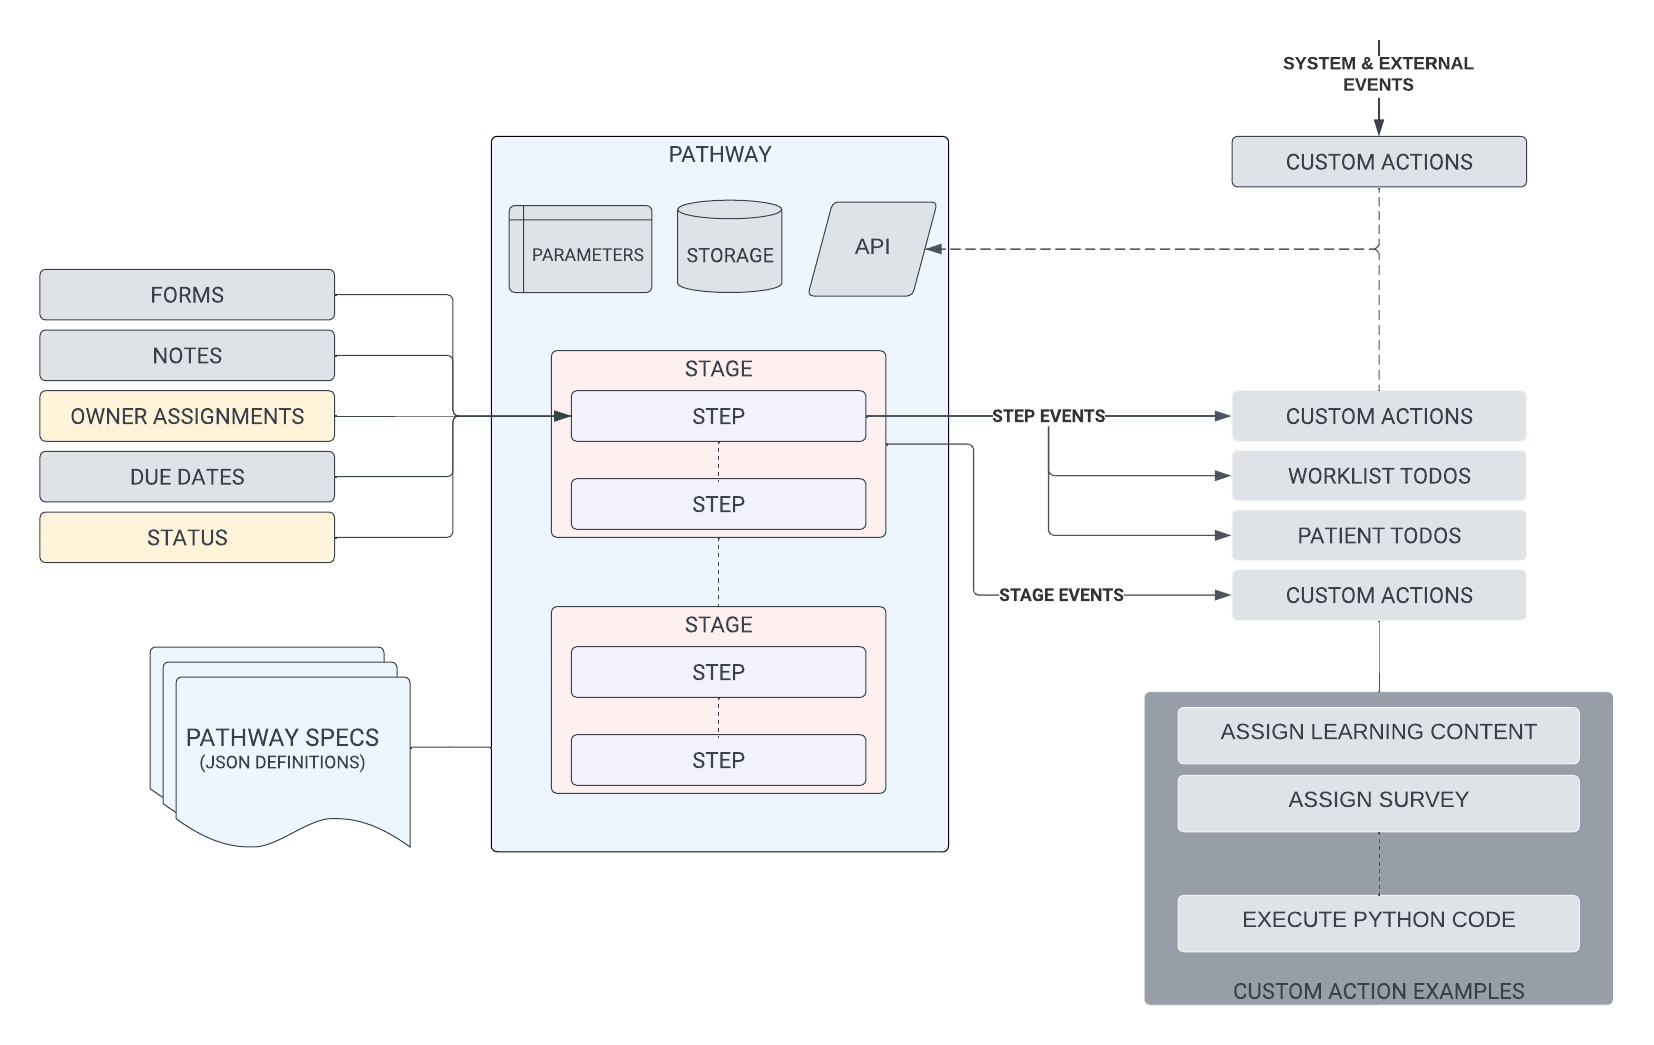
While the concepts in this guide lay the groundwork for Pathways, the functions depicted on the right-hand side of the diagram are where Pathways truly start to offer substantial value. Events from the Pathway Engine can prompt the execution of both built-in and fully custom code, influencing the Pathway's evolution. These triggers can interact with other system components or external systems to automate mundane tasks, ensuring reliable and traceable interactions.
An Example Pathway
Below is an example of a simple Pathway managing an appointment scheduling workflow. We will use this example to describe how a Pathway spec is built and deployed on the system. In the second half of this guide, we will demonstrate how to interact with the pathway using the Carium API and build a simple Python CLI to interact with the system.
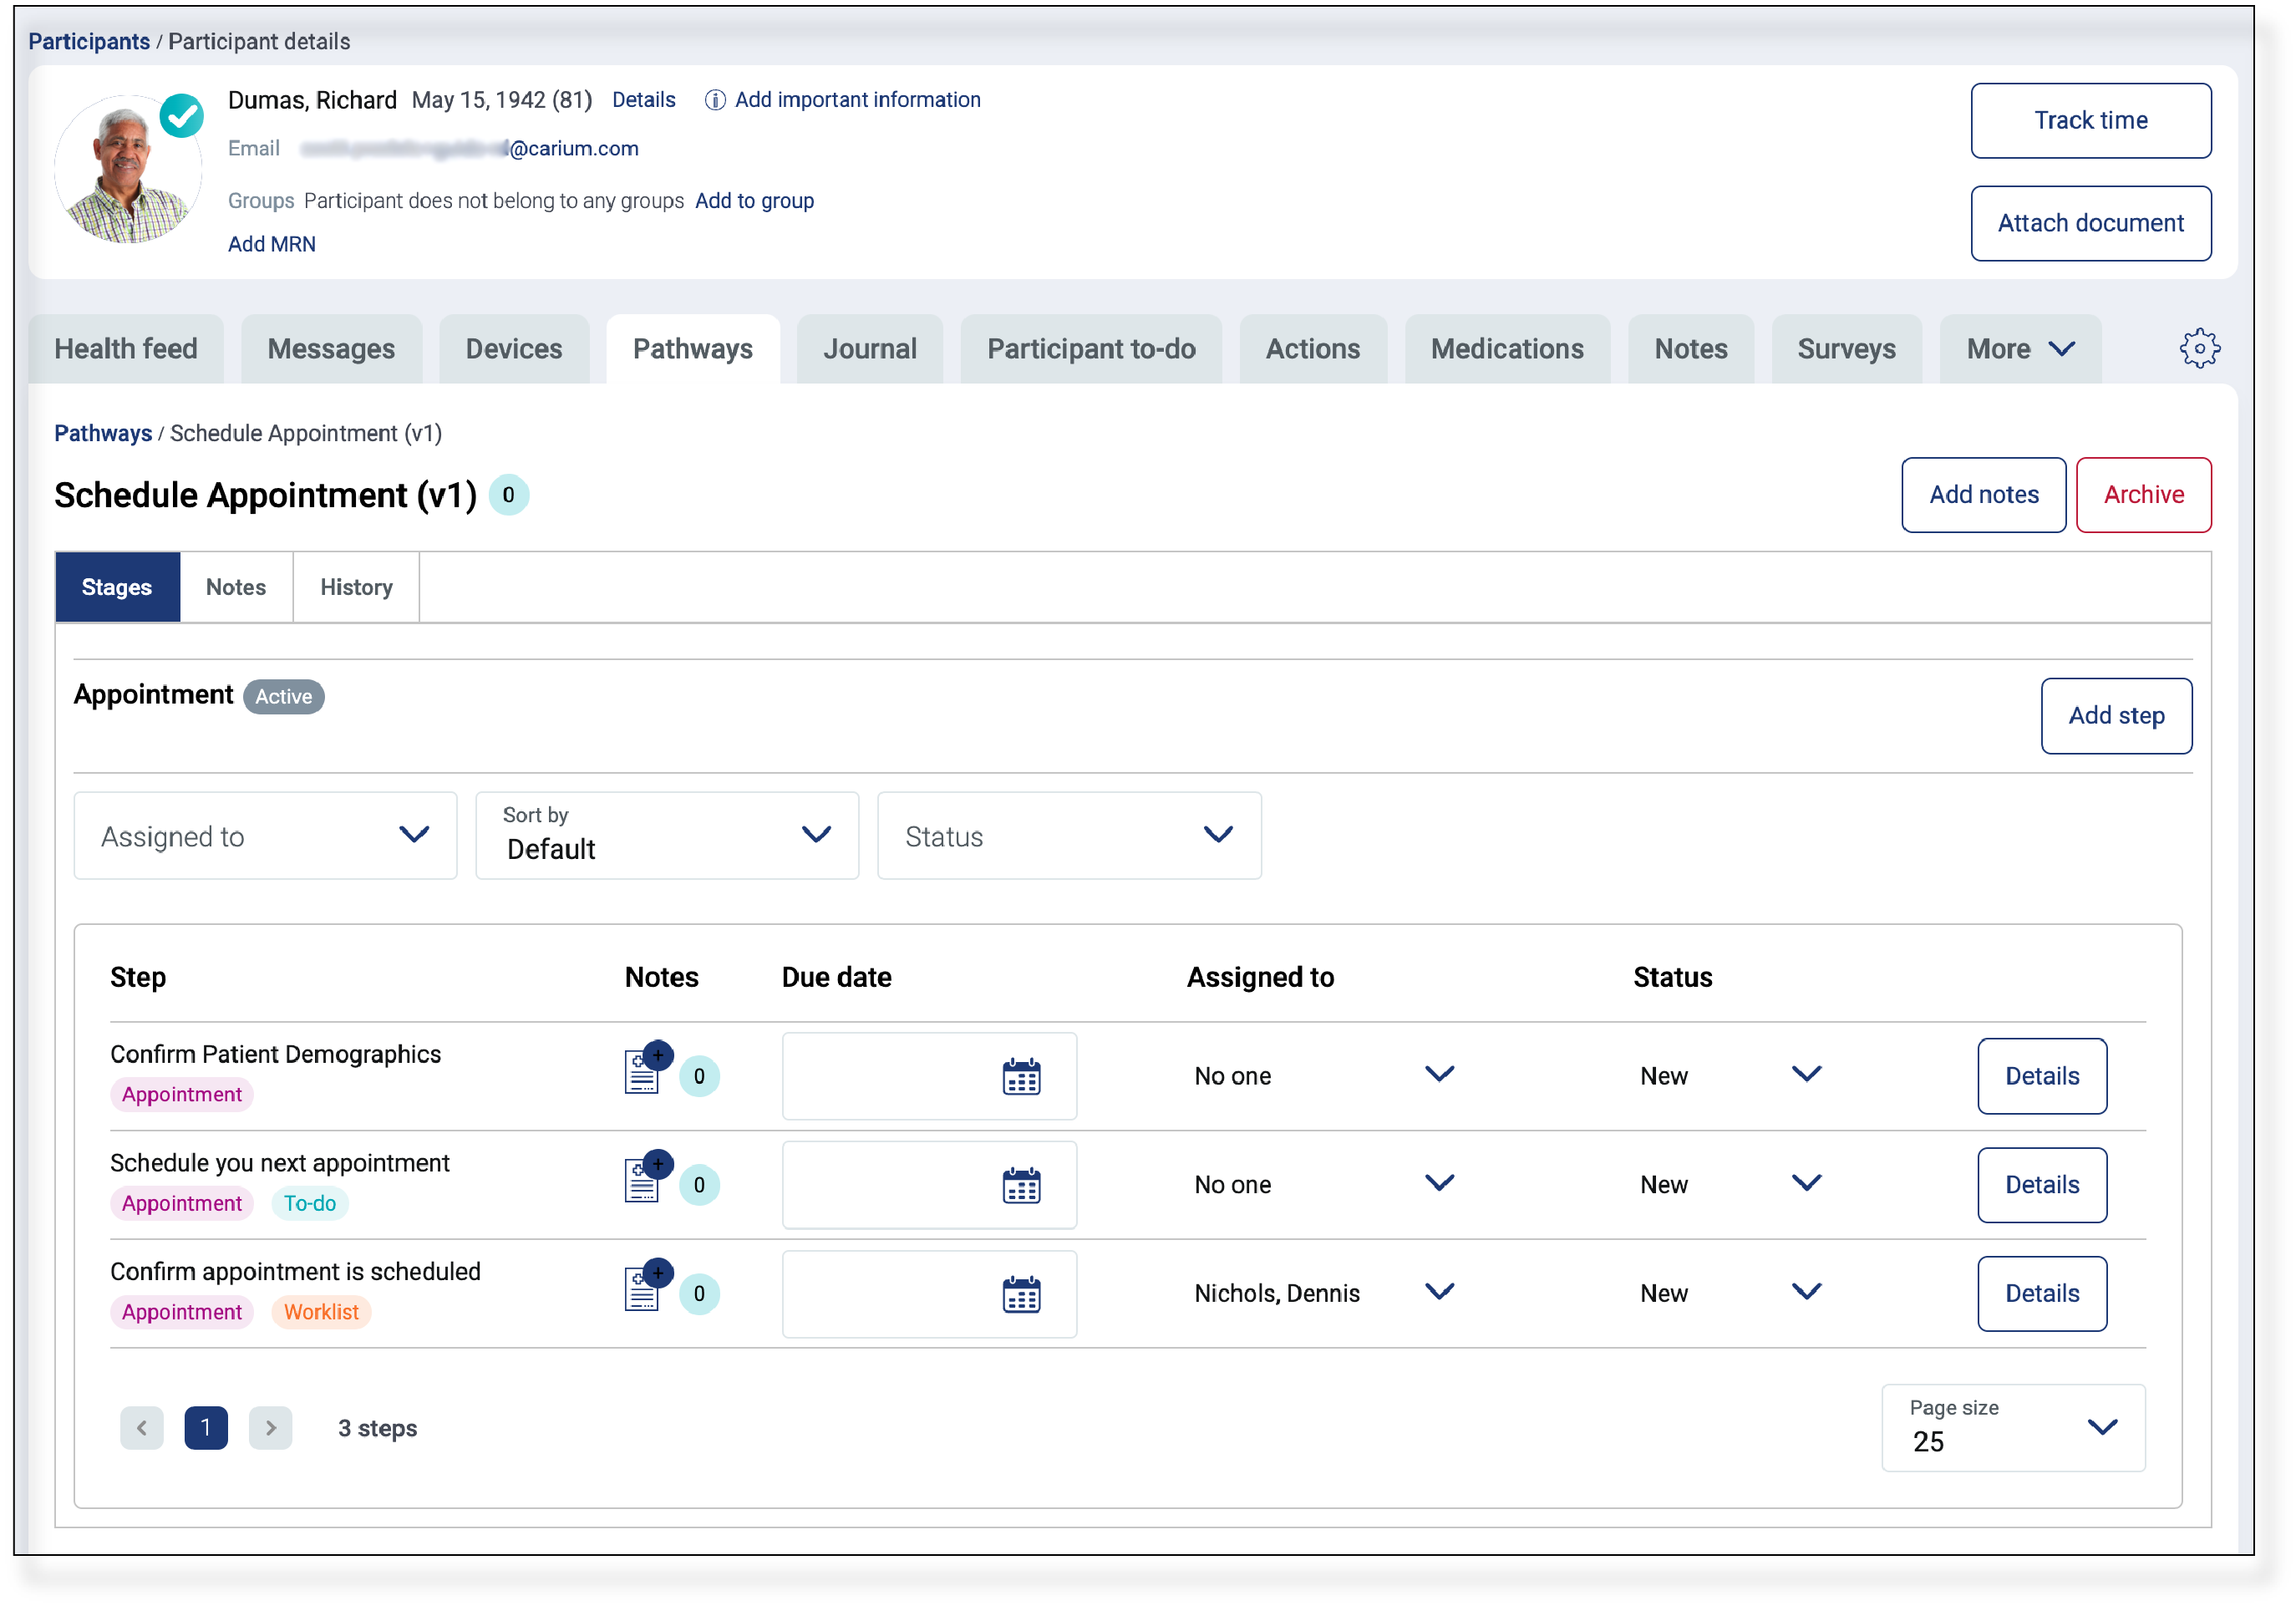
In the example above, you can see that the Pathway consists of three steps within a single stage. Each step has slightly different behavior, defined by the spec. Specs are JSON files that describe the attributes of all stages and steps in the pathway. The entire spec for the "Schedule Appointment" Pathway is shown below. In the rest of this document, we'll go through each component of this spec and explain how to configure the pathway on the system using the Carium CLI.
{
  "initial_stage": "appointment",
  "stages": {
    "appointment": {
      "title": "Appointment",
      "generate-event": false,
      "description": "",
      "order": 1,
      "steps": {
        "confirm-demographics": {
          "description": "",
          "title": "Confirm Patient Demographics",
          "order": 1,
          "type": "basic.Action",
          "deferred": false,
          "generate-event": false,
          "args": {},
          "event-trigger-types": []
        },
        "pt-appt-reminder": {
          "description": "",
          "title": "Schedule your next appointment",
          "order": 2,
          "type": "caredb.Worklist",
          "deferred": false,
          "generate-event": false,
          "args": {
            "text": "Schedule your next appointment",
            "for-participant": true,
            "provider-notes": "",
            "with-notification": true
          },
          "event-trigger-types": []
        },
        "confirm-appt": {
          "description": "",
          "title": "Confirm appointment is scheduled",
          "order": 3,
          "type": "caredb.Worklist",
          "deferred": false,
          "generate-event": false,
          "args": {
            "text": "",
            "for-participant": false,
            "provider-notes": "",
            "with-notification": true,
            "assigned-individual-id": "ac0a2b6d-3c34-4a7b-8c9d-fe396e3568f3"
          },
          "event-trigger-types": []
        }
      },
      "allow-start": true
    }
  }
}
To walk through the above we will start at the outermost layer and works our way down the hierarchy.
Pathway Spec
At the top level, the pathway spec contains the following.
{
  "initial_stage": "appointment",
  "stages": {}
}
This does nothing more than provide an object for specifying the stages contained in the spec and the default starting stage which is identified by name.
Stages Spec
Inside of the stages object a single stage has been defined. The stage is identified by a name that we chose to call
appointment .
{
  "stages": {
    "appointment": {
      "title": "Appointment",
      "generate-event": false,
      "description": "",
      "order": 1,
      "steps": {},
      "allow-start": true
    }
  }
}
The stage object has the following attributes that define its behavior.
| Attribute | Description | Type |
|---|---|---|
| title | The title is displayed in the Pathway UI | string |
| generate-event | This determines if a system-event is created when the stage is entered or exited. This can be used to drive automation. | boolean |
| description | This is used to further document the stage and will augment the title in the Pathway UI | string |
| order | This determines the order that the steps will be traversed as the Pathway is executed. | integer |
| steps | This is the object that contains the definition of steps included within this stage | object |
| allow-start | This determines whether the Pathway can be started from this stage. The UI will allow the user to advance to this stage on enrollment if this variable is set to True | boolean |
Step Spec
Finally we've the specification of the steps. In this example we've defined three unique steps and we will walk through the details of each.
Basic Step Type
The first step is confirm-demographics . This step has a type of basic.Action this is the simplest form of a Pathway
step and has no interaction with the remainder of the Carium system. The step is only visible and only interacts with
the Pathway instance where it's instantiated.
A basic step, which is the foundation of all steps in the Pathway infrastructure allows for the built-in tracking of the following attributes.
| Attribute | Description |
|---|---|
| Status | The status tracks the current state of the step and can be any of: New, In Progress, In Review, Completed, Incomplete, or Skipped |
| Assigned to | This is the care team member responsible for the step. Using the basic step type, this is only viewable from the Pathway UI or API. |
| Due Date | The date that the step is due. |
| Notes | A series of text notes can be attached to each step and viewed using the Pathway UI or API. |
In our example, the “Confirm Patient Demographics” basic step is defined with the JSON given below.
{
  "steps": {
    "confirm-demographics": {
      "description": "",
      "title": "Confirm Patient Demographics",
      "order": 1,
      "type": "basic.Action",
      "deferred": false,
      "generate-event": false,
      "args": {},
      "event-trigger-types": []
    }
  }
}
This step object has the following attributes that define its behavior.
| Attribute | Description | Type |
|---|---|---|
| description | This description is displayed in the details view of the pathway step. | string |
| title | This is the step title that's displayed in the main pathway UI. | string |
| order | This is the order that the steps will be displayed within the stage UI. | integer |
| type | This defines the behavior of the step. The multiple step types supported and these will be defined later in this document. | string |
| deferred | boolean | |
| generate-event | This determines if a system-event is created when the step is modified. This is further defined using the event-trigger-type attributes described below. | boolean |
| args | The args object allows additional attributes to be passed to the step. The basic. Action step type takes no additional arguments. The subsequent examples will demonstrate how this object is used. | object |
| event-trigger-types | This is a list of the types of modifications to the step that should trigger system level events. | list |
Patient Todo Step
The second step in our example has the title “Schedule your next appointment.” This step is meant trigger action on part of the patient and more specifically to add this step to the patient’s todo list within the Carium application. Let’s look at the specification of this step and then dig into how it differs from the basic step type.
{
  "steps": {
    "pt-appt-reminder": {
      "description": "",
      "title": "Schedule your next appointment",
      "order": 2,
      "type": "caredb.Worklist",
      "deferred": false,
      "generate-event": false,
      "args": {
        "text": "Schedule your next appointment",
        "for-participant": true,
        "provider-notes": "",
        "with-notification": true
      },
      "event-trigger-types": []
    }
  }
}
The major differences for this step versus the basic step describe above are
- The
typeis nowcaredb.Worklist. Theworklistis a function provided by theCareDBmicroservice within the Carium platform. The worklist is basically a todo list and tracks todos for both care team members and patients. - The second major difference is that we've specified some additional arguments in the
argsobject. These are defined here to support additional information needed by the system to assign this item as a todo for the patient. These additional args are defined below.
| Attribute | Description | Type |
|---|---|---|
| text | This is the text that will be displayed to the patient on their todo list | string |
| for-participant | When true this todo is assigned to the patient. We will see the behavior when this is set to false in the next example. | boolean |
| provider-notes | Providers can see the patients todo list through the patient record in the Carium UI. This allows additional be notes to be added to the todo for context. | string |
| with-notification | This determines whether the patient will receive a notification alerting them to the creation of the new todo. | boolean |
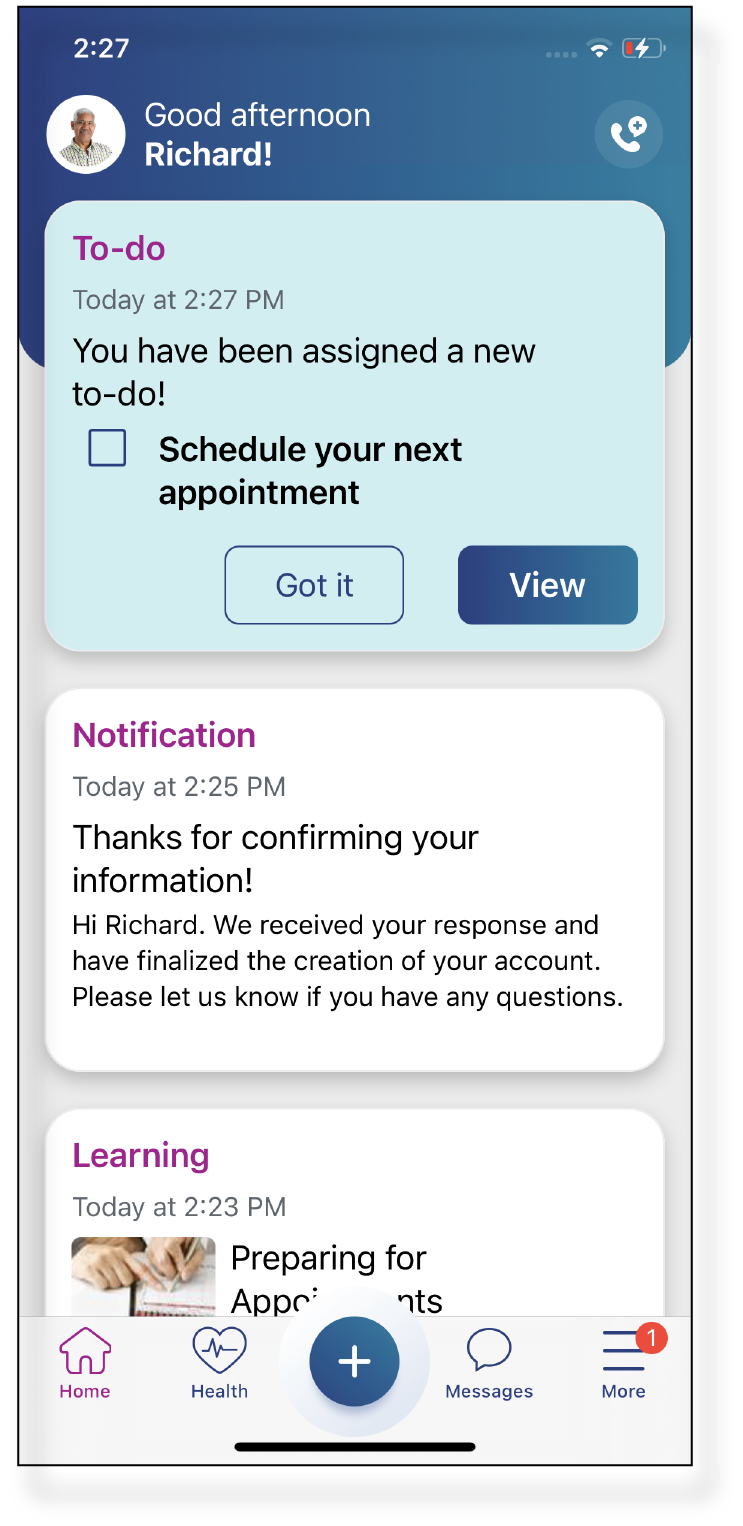
The patient will receive a todo within their Carium app as shown below. When the patient marks the todo as complete, the
Pathway Step status will be updated to In Review . A Care Team member can then move the step to Complete as
needed.
Care Team Worklist Step
This final step in the pathway looks similar to the Patient Todo we just reviewed. Here’s the spec.
{
  "steps": {
    "confirm-appt": {
      "description": "",
      "title": "Confirm appointment is scheduled",
      "order": 3,
      "type": "caredb.Worklist",
      "deferred": false,
      "generate-event": false,
      "args": {
        "text": "",
        "for-participant": false,
        "provider-notes": "",
        "with-notification": true,
        "assigned-individual-id": "ac0a2b6d-3c34-4a7b-8c9d-fe396e3568f3"
      },
      "event-trigger-types": []
    }
  }
}
We've the same type as the Patient Todo, but this time the for-participant attribute is set to false. This will
result in the item being added to the Care Team worklist when the status of the step is set to In Progress. The
behavior prevents cluttering the worklist when working with Pathways with many steps.
In the case of the patient todo, we already knew which patient the todo was intended for since each Pathway is assigned
to a single patient. In this case, we need to define who is responsible for this task. Here we provided the argument
assigned-individual-id to specify the specific member of the team that should be assigned this task. Alternatively, we
could instead supply the assigned-group-id to share the task with a care team. All members of the care team would see
the item on their worklist in this case.
All actions taken on the resulting Worklist task will be synced between the Pathway view and the Worklist view. For example, setting the due date for the task from the Worklist UI will update the due date in the pathway view. Completing a task from the Worklist view will also mark the Pathway view as complete.
Deploying the Pathway
This section assumes that you have the Carium CLI installed and an org-admin account for at least one organization on
the Carium Platform.
Using an editor, you can copy the full Pathway spec provided earlier in this guide and save it as
schedule_appointment.json or download the spec from Carium’s Github account using the following command.
curl -o schedule_appointment.json https://raw.githubusercontent.com/carium-inc/guide-examples/master/guideexamples/pathway/pathway_spec/schedule_appointment.json
You’ll need to edit one attribute in the file to allow it to work in your environment. The assigned-individual-id in
the “Care Team Worklist Step” needs to be modified to match a care team member from your organization. For your own
user, you can get your individual-id by running the command crm whoami and selecting the UUID labeled as
individual. Paste your UUID in place of the example UUID ac0a2b6d-3c34-4a7b-8c9d-fe396e3568f3 .
Now navigate to the directory where you have the schedule_appointment.json file available and run the following
command.
crm pw-spec create "Schedule Appointment"
This creates a new Pathway in the system called “Schedule Appointment.” This Pathway doesn’t have a spec yet though. The next command will upload your spec.
crm pw-spec load "Schedule Appointment" @schedule_appointment.json
The system will validate that the spec you’ve uploaded matches the schema defined for Pathways and will return an error if this check fails. “Schedule Appointment” above can also be replaced with the UUID of the pathway.
You can explore more of the pw-spec family of commands a few useful commands are shown below
| Command | Description |
|---|---|
crm pw-spec list | List all Pathway Specs |
crm pw-spec dump [specId] | Show the Pathway Spec JSON |
crm pw-spec list-stage [specId] | Show all Stages of the Pathway |
crm pw-spec list-step [stageId] | Show all Steps of a Stage |
crm pw-spec --help | Show help for all pw-spec commands |
Once your spec has been uploaded it will be available to assign to patients using the Pathways Tab within a patient
record. This enrollment can also be accomplished using the API as we will explain in Part Two. One you have enrolled a
patient in your Pathway your can also explore the pw-instance commands available in the CLI.